Enter My Latest Giveaway!!!

Check out my current Giveaways, enter for you chance to be the winner!!! Stay tuned for more to come! Be Sure to enter the giveaways that are ending soon!!!!
Check out my latest Tutorial!!!

Who's Following

Showing posts with label Kids' Birthday Party. Show all posts

Friday, August 6, 2010

What I've been up to lately....

Well, sorry for not posting anything other than giveaways lately. I have been putting the finishing touches on Princess' birthday party and getting ready for a visit from my baby sister & her fiance again, as well as my cousin being in T.O. at the same time (hoping to get to see her), as well as organizing things in the house for the trip home to visit my parents...
So it has been the busiest last little bit for me...and I am a tad stressed that everything will get done. Today it is cupcakes and cake to get baked as well the banners done, and....... OMG! where do I begin!!!!!! (Freaking out?!!! Just a little here, calling Mr. Man in tears with all the things I have to get done...he tells me that the party doesn't have to be so big all the time..... Pifff is what I say to that....)

Anyway, here are some of the projects I have been working on for the Princess primarily (you know it is hard to find projects for little boys out there in the blog-asphere), if anyone can point me in their directions please leave a link. I would love to make something for Cheeky Monkey.

Little dress I like to call "butterfly flutters"


Isn't it cute....I will try to put together a tutorial when I get back from my vacay.


Princess' Birthday outfit
can't rotate sorry for picture
Tute for this too...


I will take a picture of her wearing it at her party....Sunday!!!


Cupcake stand (tutorial for this too and some don'ts when it comes to using certain woods)
Not completely finished
but I give you just an early peak at it
(Princess hasn't even seen it yet)

Now you know what I've been doing..............lots and lots still to do for Sunday!!!
Have a great weekend!!!

Totally Tutorials Blog
My (and Mr. Man) have the Cupcake Stand featured on Totally Tutorials!

Ciao!!
Photobucket

Tuesday, July 20, 2010

Planning a 3rd birthday is underway....

The countdown is on.....Princess turns 3 in less than 22 days and I had to re-plan the party theme. After her seeing all 3 Toy Story movies, she came out of the final movie telling me she wanted a Toy Story party.  I kinda anticipated this but wasn't prepared for the fall out from the movie. She is Jessie's biggest fan. And you know it is hard to find Jessie theme party ideas so it has become a Toy Story party....

I have a number of templates and tutorials that I will post as I get them up...probably after the party. I will give you guys some hints and I have one blog that I did get some free printables, Crafty Workin Mommy. Here you'll see some fun printables and links to other websites to find Toy Story theme. Also Disney Family website has Toy Story ideas and printables as well.

Oh and I wanted to let you know I found some great deals on scrapbook supplies here in Canada, I am sure there is US locations as well....Sandylion has a Sticker Warehouse here in Ontario. They own the rights to a number of Disney and nickelodeon characters....Toy Story, Dora, Thomas, Batman, Sponge Bob, Disney Pricesses and Disney Fairies to name a few. And the prices are unbelieveable...I got paper here cheaper than at Michaels (regular priced). So check out the locations in your area.

I am waiting for the Toy Story Cricut cartiridge to arrive and will be there waiting to pick it up on the day it arrives.....hopefully before the Birthday party.

Take care,
Photobucket

Wednesday, June 2, 2010

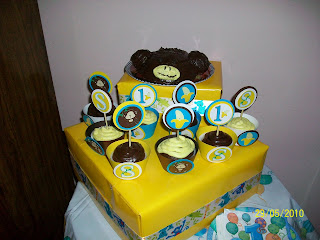
Cheeky Monkey 1st Birthday Party Stuff


Well as most of you know...Cheeky Monkey turned 1 yesterday!!!! Here are some of the party pics from Saturday! I hope you will enjoy looking at them...as much as I had making them...

Cheeky Monkey's cake


Party cupcakes for guests
 Centrepiece and Cheeky Monkey's Shining Star Softie
Wall behind the table...Monkeys from the Cricut
Monkey's chair


Monkey's Birthday Hat (which he wouldn't keep on) embellishments from the Cricut


Cheeky Monkey's special seat and banners I with my Cricut

I will have more pictures coming from my sister soon, my camera battery died on me as I was taking these so I was lucky, since one sister lives in New Brunswick and the other lives in Brampton (45 min drive).

Please leave a comment, I am thinking about opening an etsy shop with my crafty cutouts and banners as well as cupcake toppers, candy bar wrappers, party hats, and napkin rings...and more. Do I have a chance at surviving at this....just to bring in some extra money for the kids???? Let me know your opinion.


Photobucket

Thursday, May 20, 2010

Favour Cans....

I was trying to get this tutorial done for Someday Crafts' Categorically Crafting, back n May, but just couldn't with Cheeky Monkey's party planning taking over so here it is....

The Princess wants an "Under the Sea" party for her 3rd in August, so I attempted to take the millions (it seems like it) of formula cans and turn them into a Favour Tin of some sort.

1. Gathering of materials I needed:
a formula tin, or any tin (coffee, pirouline, etc), scrapbook paper, glue gun and glue, paper cutter, measuring tape, modge podge, ribbon, Cricut, & Create-a-Critter cartridge)
* No Cricut, no problem just gather stickers, and embellishments in the theme you choose.

2. Removed the paper from the outside of the can. Also I washed out the inside of the can & the cover (make sure you dry it very good.)
                                                      
3. I cut out my embellishments from the Cricut cartridge on my Expression (gotta love Mr. Man for getting me this for our anniversary last year) Then assembly the cut-outs with a glue stick or brush and paper glue (your choice).

  
                                        Here are the finished embellishments I chose for the can:
                                             

4. Now since it was going to be kids getting these I wanted to be safe (the inside of these cans are sharp. I have cut myself several times when scooping out the powder)

...So what I did is took my glue gun and ran several row of hot glue around the edge until it was built up and covered the sharp edge. Then I took a length of ribbon and started to cover the glue rows with it by running the hot glue around the top just inside the rim and the glue on the sharp edge. Pressing it in as I went along.
 
Voila!!!!!! 


Here is what the inside looked like after I finished.....No more Sharp edges!!


5. Then I took the measurements of the can from rim to rim. [Mine was 13 cm (4 15/16th")]. Then measured the circumference, mine: 41 cm (16.5")....scrapbook paper is only 12 X 12 so I had to piece together some pages.
 

I used an elastic to secure the paper until the hot glue dried, which I ran around the edges and the overlap of the paper. I did not remove all the glue from the can's wrapper and made use of this to hold the paper in place too.

6. Then I attached the embellishments to the outside once it was dry.
                          Here's what the shell says... 

7. Modge Podge the circle that fit just inside the dip in the cover, approx. 5" diameter. Then added the crab.
                         

8. Ta-da!!! You're done...now fill with the treats.


           It was a hit with the Princess, she carries it around all the time talking about her party.

* A few of things I will do differently on the next one:
1. I would have changed is putting ribbon length under the scrapbook paper in the beginning so as to create a handle to carry it.
2. Modge Podge didn't really stick the crab circle to the cover, so I would use glue dots next time.
3. Option to the  crab and circle would be to make a hole so the favour tin becomes a bank after.
4. Ribbon around the bottom rim 

I hope that I made tis tutorial understandable. Please feel free to leave a comment if you have any questions about what I did. I will post pictures of the other tins as they are completed. 

I also used one as a time capsule for the Princess' 1st birthday....now must make one for the Cheeky Monkey's 1st birthday!!!!

My little sister wants to use some for her wedding next year, possible table decorations...will keep you posted.


I have linked up to these Link Parties, but I put the most current link parties here too.


Get your craft on Thurs.
HookingupwithHoH
BCD Show and tellgiveaways
PonyTails and FishScalesMake it Yours @ My Backyard Eden


                  Transformation Thursday        


Have a good one everyone!

Ciao,
Angela
A Mama with 2 Cents Worth to Share

Wednesday, May 12, 2010

Cheeky Monkey is Turning 1!

One Year where has the time gone?.......


I looked at the calendar today and thought to myself that the year has just flown by....Cheeky Monkey will be turning 1 in just  20 days and I have been nailing down the party planning aspect with sooo many  ideas jotted with a definite date already chosen...my baby sister and her fiance are coming on the May 2-4 (Victoria Day Long Weekend here in Canada) to stay for a week so it had be while they are visiting.  But it was the other things: theme, favours, invites, food, cake and decorations; they were still bouncing around in my head causing me to stay up late and cruise the internet for ideas for the last 2 1/2 weeks.
I have been glued to my Cricut, and causing our kitchen/dining room to be taken over by my party planning antics....finally yesterday I moved the Cricut back to its place on my craft table, why you probably ask did I drag it all to the kitchen/ dining room....well you see I have a very curious 11 month old and and even more curious 34 month old, who would steal the Cticut cartridge boxes and keyboard pads and pretend she was at a computer. So the kitchen/ dining room was the safest place for me to work. After several days of Cricut overload the cutout, I think are done and most assembled (but it doesn't take long so can do it anytime). I have a file folder full of cutouts. I have a couple little cuts to do but they are minor and will take no time...I hope.

Here's a look at the invite. I got the idea while searching on One Pretty Thing. It came from the blog, Fowl Single File, when she celebrated her daughter's 3rd birthday with a Banana themed party. She design this invite as a variation of one found on Parents magazine's  party ideas for a jungle party.


"Peel Me" Banana invite

Theme: 
Cheeky Monkey turns 1!!!!


Colours: brown, yellow, turquoise and white


Numbers: well they have dwidled to just family this year, due to prior engagements of friends...so 2 kids the rest will be adults (which is okay, less of those incidents that took place at other parties to repeat themselves...believe me not something I want to relive from the last few parties).


Inside of invite


Location:Our birthday parties are fairly small, so it will be here at home, outside (weather permitting). Now I just got  to make a list of supplies I need to buy....


There will be lots more pics of the other decorations I am making so stay tuned.... It is a fun and exciting time for us here!

Close up of invite inside

**Sorry the pictures are sideways need to fix them on photobucket or picasso.


Once party  #1 is over I need to make quick work to get ready for Party #2 comes next...The Princess' 3rd Birthday which will be fast approaching ..only 2 months after Monkey's. She is much harder to get ideas for but I have some ideas kinda popping up every once in a while. She telling me she wants an "Under the Sea" party...little mermaid type theme.

I will keep you posted on how the plans are coming a long and maybe out of may come so tutorials to help out you parents that find yourself stuck like me.

Links to:
PonyTails and FishScalesNightOwlCrafting
Join us Saturdays at tatertotsandjello.com for the weekend wrap up party!
The Girl Creative


Make it Yours @ My Backyard Eden
Beyond The Picket Fence
BCD Show and tell


Photobucket